Rules
Overview

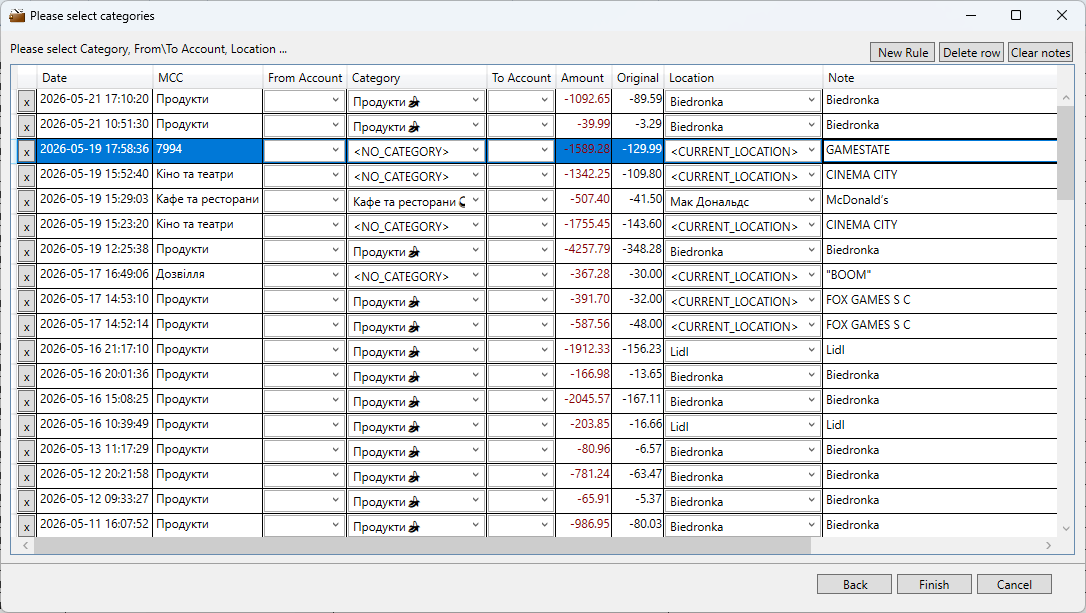
Rules are automation tools that help you automatically categorize and organize your financial transactions during bank report import. When a transaction matches a rule’s condition, the rule automatically applies predefined settings to that transaction. Rules are applied on page 3 of the Import Wizard when importing bank reports.
What Rules Do
Rules help you save time by automatically:
- Assigning categories to transactions
- Setting locations for transactions
- Assigning transactions to payees or projects
- Organizing your financial data consistently
Instead of manually categorizing each transaction, you can create rules that handle repetitive categorization automatically.
Rule Fields
When creating or editing a rule, you’ll configure the following fields:
Description
A friendly name for your rule (e.g., “Grocery Store Purchases”, “Monthly Salary”).
Condition
The matching criteria used to identify which transactions this rule applies to. Three condition types are available:
- Contains - Matches transactions whose description contains specific text (e.g., “COFFEE” matches “STARBUCKS COFFEE”)
- Match - Exact match of the entire transaction description
- MCC - Matches transactions based on Merchant Category Code (a standardized code assigned by card networks)
Category
The transaction category that will be automatically assigned when the rule matches.
Location
The location/branch that will be assigned to matching transactions (optional).
Payee
The payee/merchant associated with matching transactions (optional).
Project
The project this rule should be assigned to (optional).
Active Status
A toggle to enable or disable the rule:
- Active (checked) - The rule will be applied to matching transactions
- Inactive (unchecked) - The rule will be ignored
How to Create a Rule
Step 1: Open the Rules Section
Navigate to the Rules section in your application. This section allows you to manage rules that will be applied during bank report imports.
Step 2: Add a New Rule
Click the “Add” or “+” button to create a new rule.
Step 3: Configure the Rule
A dialog box will appear with the following default values:
- Description: “Description here” (edit this to something meaningful)
- Condition: “Description contains”
- Active: ✓ (enabled by default)
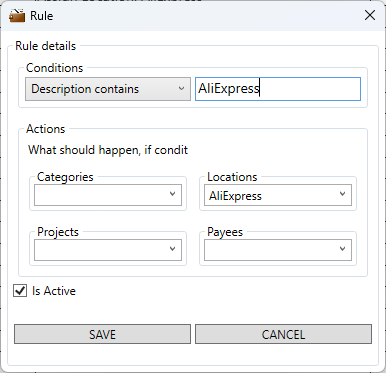
Step 4: Enter Rule Details
- Update Description - Replace with a descriptive name for your rule
- Set Condition - Choose the condition type:
- Contains - For partial text matching in descriptions
- Match - For exact description matching
- MCC - For merchant category code matching
- Specify Match Criteria - Enter the text, pattern, or MCC code to match
- Select Category - Choose the category to apply to matched transactions
- Optional Fields - Fill in Location, Payee, or Project as needed
- Enable/Disable - Check the “Active” checkbox to enable the rule
Step 5: Save the Rule
Click “OK” or “Save” to create the rule.
Example Rules
Here are some practical examples of rules you might create:
Example 1: Coffee Shop Category
- Description: Coffee Shop Purchases
- Condition: Description contains “COFFEE”
- Category: Dining & Entertainment
- Active: ✓
Example 2: Salary Income
- Description: Monthly Salary
- Condition: Description contains “ACME CORP PAYROLL”
- Category: Income
- Active: ✓
Example 3: Gym Membership
- Description: Monthly Gym Fee
- Condition: Description contains “24 HOUR FITNESS”
- Category: Health & Fitness
- Location: Downtown Branch
- Active: ✓
Tips & Best Practices
-
Be Specific: Use descriptive rule names so you can easily identify their purpose later.
-
Use Clear Conditions: Make your condition text specific enough to avoid unintended matches, but general enough to catch all relevant transactions.
-
Organization: Group similar rules together by creating them in sequence.
-
Testing: After creating a rule, verify it’s working correctly by checking that transactions are categorized as expected.
-
Inactive Rules: You can disable rules temporarily by unchecking the “Active” status instead of deleting them.
-
Update as Needed: Review and update your rules periodically as your spending patterns or merchant names change.
Troubleshooting
Rule Not Matching Transactions
- Check the condition text matches actual transaction descriptions
- Verify the rule is marked as “Active”
- Try more general condition text
Rule Matching Wrong Transactions
- Make the condition more specific
- Use longer or more unique text in your condition
Can’t Find a Rule
- Rules are listed sorted by creation date (newest may appear at bottom)
- Scroll through the complete list
- Check if the rule is disabled (not active)
Notes
- Rules are applied during the bank report import process on page 3 of the Import Wizard
- Rules automatically update transactions as they are imported
- You can have multiple rules active simultaneously
- Rules are matched based on their conditions against transaction descriptions during import
- To apply rules to transactions, import a bank report using the Import Wizard
For additional help or questions about rules, contact your system administrator or refer to the main application documentation.